
How the Mad Lad Mads Burnell Strangled The Hangman
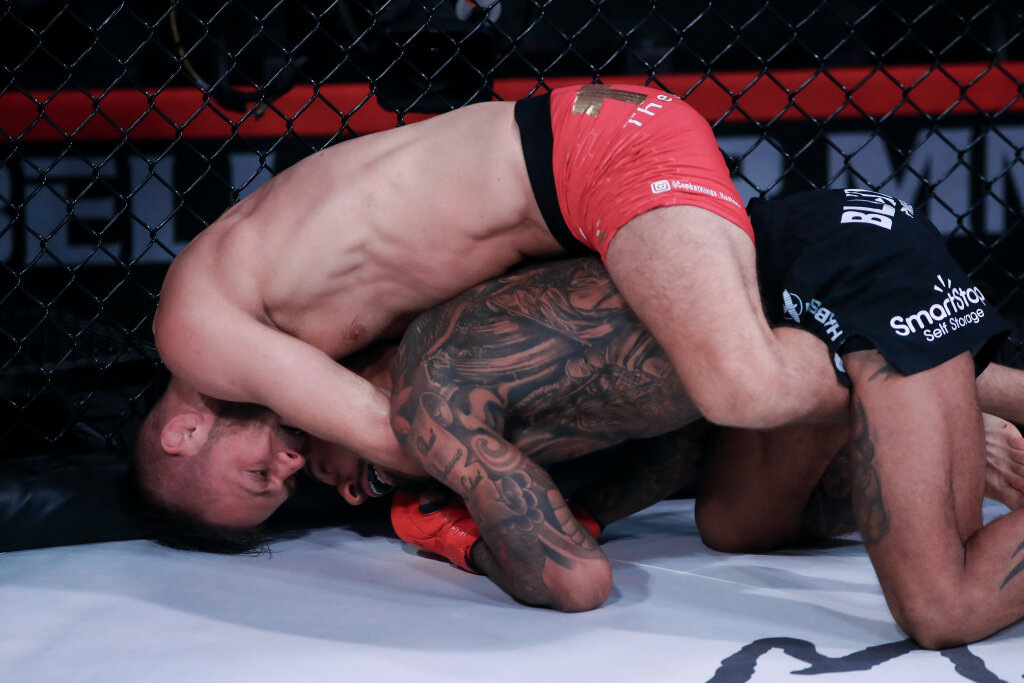
Photo courtesy of Bellator MMA
In our newest podcast, Say Oss Again, we’ve spent time breaking down the guard, the most recent episode being dedicated to the best guards - butterfly and half-guard. It’s rare in MMA to see someone apply the basic principals of these positions from the bottom well, and even rarer at the higher levels of MMA. The meta of grappling in MMA has been set, and Mads Burnell frankly doesn’t give a shit.
Mads Burnell is one of the best prospects at 145 and just secured his second submission victory in a row at Bellator 257 over Saul Rogers, a very capable grappler himself. If you recall, Rogers outgrappled Ryan Hall on The Ultimate Fighter. Burnell has already proven himself a dangerous finisher on the mat prior to this, scoring 9 submissions out of 15 wins, but, in my eyes, his positional awareness, transitional ability, and usage of the butterfly and deep-half guards to get on top were the most impressive parts of his performance.
The very first sequence set the tone for what it would look like whenever Rogers was able to score a takedown and get top control.
Rogers gets in on a takedown attempt, and secures it. Mads, rather than desperately attempting to create space, or wall walk, etc. immediately underhooks the leg of Rogers to work a deep-half guard. Rogers is aware and pulls his lower body away, keeping his grip around the waist of Mads tight, preventing him from getting under Rogers. You can also see Mads has his hand stuck just past the armpit of Rogers, who does not want Mads getting an underhook.
Take a look at Mads’ feet at 4:47. He needs space to get a deeper underhook and to get under Rogers. He brings his left foot over the calf, replacing the right foot securing Rogers’ leg. He posts his right foot and pushes off the mat, elevating Rogers and giving Mads a bit of space, which is all he needs, to dig his underhook deeper. Rogers is able to stop him from fully securing the underhook, or sliding under him, as he does have a strong lock. The grip is also secured under Mads’ leg, a loose cradle almost. It allows him to pull his hips back away from Mads, but not for long. Because Rogers pulled himself away, Mads cannot keep pursuing the underhook. He posts his right elbow on the mat to sit up, opening Rogers up, scooting himself closer to his hips again. He re-inserts his underhook and slides himself a little closer to once more dive under for the deep-half guard. Now Mads is completely under Rogers’ hips, forcing him to release the leg and post to avoid being swept. Rogers still has a grip around the head of Mads, and after pushing himself back, is resorting to a last ditch arm-in guillotine grip. There is no danger for Mads at this point, as his underhook is deep and he can begin to come up for the single leg.
It’s important to note the little details as well of these sequences. Notice how Mads is constantly replacing his hooks/feet? This is necessary for what he wants to do. Once Rogers stops the deep-half sweep, Mads switches his hooks because he is going to be establishing a base on his elbow and knees to come up for the single leg (i.e. a staple of Demian Maia’s game). Mads then uses his underhook to slide himself further down Rogers’ body, posts his elbow, and turns his hips to the mat. At this point, it’s over and Mads secures the single leg, with Rogers hanging onto the his arm-in grip as Mads secures top control.
After an extended amount of time working from top position (and we’ll get to Mads’ top game, don’t worry), Rogers would have another chance to get control of Mads on top and do some damage, but we would see a lot of the same principals applied to stop him once again.
After being taken down against the cage again, Mads takes a quick breathe and begins to work the underhook in again. Rogers is trying to figure out the best way to control Mads here, and keeps switching from a crossface to push him away and his arm over the head (similar to the prior sequence with the cradle). Mads keeps posting his elbow, scooting under a little, and reaching for the leg to get under Rogers again. When he doesn’t get it, he tries again until he can finally reach under him. Rogers knows he’s in a bad spot, and tries to slow things down, sitting on his left leg to try and kill Mads’ underhook. Mads scoots his weight under and elevates Rogers up, forcing him to try and use his own head as a post on the mat so he would not have to release his grip on Mads’ leg.
It doesn’t work, and he’s forced to post his hand too. This allows Mads to pummel his left foot inside, giving him double underhooks as well as securing both butterfly hooks. Rogers defends well, and his strength certainly aided him here, as he is able to pull his hips back, making it difficult for Mads to get under his hips properly for a sweep. He transitions back to his half-guard with the underhook now on the right side, and tries once more to get the single leg. Rogers defended well this time, creating a frame against Mads’ face, preventing him from gluing his face to Rogers’ chest. Because of the space created, as Mads begins to work the single leg, Rogers has enough space to free his leg and stand up with Mads. He briefly attempts to get a back take but Mads is wise to it, shuts it down, and shoves Rogers into the fence.
Here, Mads’ bottom game shows just how good staple guards in BJJ can be when applied properly in an MMA context. His constant off-balancing of Rogers, the multi-layered threats he’s presenting, and non-stop movement under Rogers never allowed for a moment of rest or control. The ground and pound was never a threat because Rogers never had a solid enough base to safely throw strikes. Mads’ linking of his guards were just too fluid for Rogers to keep up with and showed the superior level of skill Mads was operating with.
Mads’ top game, meanwhile, is just as good as his bottom game, and he got to show it off just as much. His constant passing attempts, switching of directions, high to low passing, mixing in strikes, and heavy pressure forced Rogers to fight at a ridiculous pace on the ground - one he was not able to keep up. The constant movement and adjustments Mads would pressure Rogers into making was not sustainable, keeping him on the defensive and reacting to whatever Mads was doing. It both kept Mads safe while on top while breaking down the Rogers’ defenses as the fight wore on.
Here we see an example of Mads’ positional awareness on the ground.
Rogers has a guillotine on wrong side, and is trying to fix that. He has a leg in between Mads’, and sits up to try and work in his second butterfly hook so he can shift his hips to the other side and work on actually locking in a proper guillotine. Mads recognizes the danger instantly and pulls his leg up and away before bringing it back down in a near pass position.
These little things, the instant recognition of a moment of offense being worked on by his opponent and ability to shut it down before it happens shows the difference in levels here. It’s worth nothing that Rogers is a very capable grappler himself.
This next clip is a neat grappling exchange as well, and displays the skill level of Rogers as well, as they go back and forth in a battle for position, which ultimately leads to Rogers being able to get both his butterfly hooks in and retaining his guard.
He is trying to recover a closed guard, but his right foot is trapped as Mads has closed off the space necessary to bring his leg through and lock the guard. He’s keeping pressure with his hips on the hook.
Sidebar, Rogers in this situation could have framed against the face and neck of Mads to hip escape out to his left and gotten some more space, but this is a fight and there are, subsequently, fight factors at play here.
Mads elevates his hips up and begins to immediately circle to his left, closing off space and collapsing the guard of Rogers, who’s forced into a weak Z-guard. Normally when operating the Z-guard, you want to have your knee pushing against the hip or chest of your opponent, with your feet locked around the hamstring or under the butt. Here, Rogers has zero control of Mads’ hips, as Mads has his own hips pressing down on the knee of Rogers, folding his legs over one another, preventing him from being able to off-balance Mads or create sweep opportunities. You see Rogers recognize he doesn’t have much here, tries to come forward and lock his ankles around Mads’ hamstring. Mads pulls his leg back away to stop him with a backstep. Because Rogers’ legs are now extended, he’s able to replace his leg over the top leg of Rogers. However, there’s a bit too much space now on the right side because of how low Mads got. Rogers sees this (you can see him eyeing the space as his hand is pushing against the quad of Mads) and brings his right knee with his shin and hook. He gets the underhook, elevates Mads, and brings in his other butterfly hook.
It wouldn’t be a Mads Burnell fight if there wasn’t at least one attempt to finish the fight with his specialty: the Japanese Necktie. It’s Mads’ favorite submission, and he’s already got four of them on his record.
Rogers shoots in for a takedown, which is stuffed by Mads, and he immediately gets to to work on setting up the submission. He locks in the grip behind the head of Rogers, circles around, and hooks the top leg before forcing him over onto his side. It looks tight, and it’s definitely put Rogers in danger. Mads has good control of the head and with the leg secure, needs to drive his hips in to get the finish. Rogers is prepared well, and as Mads starts to hip in, you can see him begin to scoot his hips away little by little, sliding the leg out. Notice how far down the leg Mads has gone because of those small movements of Rogers. Rogers is definitely in trouble, but he’s remaining calm, using his arm as a frame to give himself as much space as possible. He continues to pull his leg further and further out before Mads chooses to release the choke, work from top position landing strikes, and hold Rogers in half guard for the remainder of the round.
Mads himself said Rogers defended well and didn’t want to gas his arms out trying to force the choke (a wise decision).
The second round was an absolute clinic of top control grappling by Mads. This extended sequence on the ground shows everything Mads does so well on top. His constant passing attempts exhausted Rogers, who never had a moment to just stop and hold on or set up his own attacks from the bottom, broke down Rogers as the time ticked away. Keep an eye out for the things I’ve isolated earlier. The constant windshield wiper-ing of the legs as Rogers attempts to recover his various guards, his collapsing of the Z-guard, pulling out Rogers’ posts, the pressure he exerts on the upper body, tripoding as he elevates his hips to work his passing, the backstepping over Rogers’ attempts to trap his legs or get a hook in, as well as mixing strikes in transition and to force Rogers to open up advancement opportunities for Mads.
At this point in the fight, we see Mads has started to break through all of Rogers’ defenses.
Mads pins Rogers’ back to the mat, elevating and turning his hips, bringing his weight over the right side of Rogers. What you can’t see is he uses his left foot, placing it over the knee of Rogers, and then backsteps over to pass to side control (beautifully done). Rogers is desperate to recover guard, and frames, pushing and twisting to try and get back to at least a half guard, which Mads actually obliges him here.
This is something I really like, he knows he’s winning this fight and, rather than wasting energy (as Rogers is being forced to do to recover positions) on holding a good spot, he will take a step back to establish a stronger position and resume his advance forward. His confidence and skill here allow him to conserve energy where many fighters would be wasting it to hold on to side control.
Mads once again establishes heavy pressure by pulling Rogers’ post out, flattening him on his back, and this time passes his right leg over into a full mount. Mads begins to tee off on Rogers, landing a steady stream of hard punches while Rogers looks to escape the mount.
Throughout the fight, Mads has been landing sneakily hard shots in transition and this is a good example of his adept use of ground striking. When the openings are there, he will open up. Once they close, as they do when Rogers is able to escape the mount, he moves back to controlling him. He seamlessly transitions from striking, to positional control, to positional advancement, and works them in tandem.
Here we come to the finish, as Rogers is breaking down completely. He’s being smothered and is exhausted as he turtles up. Mads knows he can push for a finish and takes his back against the cage, landing shots to open Rogers up to slide his forearm across the neck. You can see the panic register as Mads gets it in and Rogers goes back to all fours. Mads is controlling the right hand though, which stops him able to reach up and fight the grip. He flattens him out, clasps a palm-to-palm grip, and finishes the fight.
Mads put together a complete grappling performance in this fight, against a highly capable grappler, and it was damn near flawless. It’s a big notch in his belt, and his sublime grappling skills will make for some really fun fights, as well as some big problems, going forward against Bellator’s elite guys.
Now, I’d be remiss if there was no discussion of Mads’ striking game and his execution on the feet. Mads is a massive fan of boxing, and you can tell how much time he’s invested into becoming a very good boxer himself. So rather than just talk about it myself, I asked some very smart striking analysts some of you may know to chip in and talk about that.
Ryan Wagner: Mads was using a dipping jab nicely to close the distance, but not being too rote with his level changes. He’s feinting them to confuse Rogers, reading the counter uppercut and avoiding dipping into it. He’s also got a responsive high guard that is keeping him safe in the exchanges as well. He has a really nice cross-armed guard, but isn’t using it as much here.
Ben: I have mention those thudding leg kicks he was landing on Rogers as well. They really knocked him out of stance multiple times and he realized he couldn’t fight at range with Mads, and we’ll see he couldn’t play at mid-range much either as well. We also see the uppercut land here and Mads basically has a read on it for the rest of the fight after, as Ryan mentioned.
Tumen: He’s also keeping his head really low which is a neat little detail. When jabbing, he moves in pumping the jab with the head low, which gives him some additional protection because it makes it more likely for the opponent to hit him in the forehead instead of the face while moving in. It doesn’t expose him to the uppercut as much as ducking, as Ryan said. For a specific example of that, we see Mads draw out the uppercut and counter with a big overhand right.
Mads jabs and feints continued to draw out big responses from Rogers as well, and we can see him here slip inside of a right by Rogers and rip the body.
The final striking exchange of the fight actually perfectly captures everything we’ve mentioned so far as well. The dipping jab entries with his head low, feints to draw out reactions, the leg kick, his active high guard keeping him safe, as well as a moment of a cross-armed guard while using the dipping jab as well (pointed out by Tumen). The pressure of these attacks and counters working so well together got Rogers to shoot in, and Mads sprawls, gets Rogers on his back, and would remain on top until finishing the fight.
At just 27 years old, Mads is continuing to show improvement as he starts to enter his physical prime. He’s already displaying skills and mentalities towards fighting we don’t see in many top fighters, and I for one am very excited to see Mads continue to rise up the Bellator rankings.